
Imagine having the perfect punching bag right in your own home—a tool that matches your fitness needs and is crafted by your very own hands. Creating a punching bag can be more than just a DIY project; it can be a personal accomplishment that boosts your confidence and enhances your workout routine.
Whether you’re looking to blow off some steam or sharpen your boxing skills, making your own punching bag gives you control over its size, weight, and filling. This means you can tailor it precisely to your training goals. You’ll discover how simple materials and a little creativity can transform into a powerful training companion.
Ready to learn how to make a punching bag that fits your unique style? Let’s get started!
Credit: boxingathome.medium.com
Materials And Tools
Gather sturdy materials like old clothes and canvas bags. Use duct tape, rope, and scissors for assembly. Ensure the bag is tightly packed and securely hung for durability and safety.
Creating your own punching bag can be a rewarding and cost-effective project. To get started, you’ll need to gather the right materials and tools. This section will guide you on what you need and why it’s essential, ensuring your DIY punching bag is durable and effective.Essential Materials
To construct a sturdy punching bag, certain materials are non-negotiable:- Outer Shell:Choose a heavy-duty canvas or vinyl fabric. These materials can withstand repeated impacts without tearing.
- Filling:Use sand or sawdust for weight and shredded fabric or old clothes for volume. Combining these will give your bag the right balance of firmness and flexibility.
- Chains or Straps:Opt for metal chains or strong nylon straps to hang the bag securely.
- Zip Ties or Sewing Supplies:You’ll need these to seal the bag and prevent the filling from spilling out.
Recommended Tools
Having the right tools makes the assembly process smoother:- Heavy-Duty Sewing Machine:Essential for stitching tough materials like canvas or vinyl. If sewing isn’t your forte, zip ties can be a quick alternative.
- Drill:Use this to make holes in the chains or straps if adjustments are needed.
- Scissors:A sharp pair will help you cut fabric and trim filling materials efficiently.
- Measuring Tape:Ensure your bag is the desired size and dimensions by accurately measuring before you start cutting and filling.

Credit: www.youtube.com
Choosing The Right Bag Size
Choosing the right size for your punching bag is crucial. It affects your workout quality and space arrangement. A properly sized bag enhances your training experience, allowing for effective practice. Consider the space available and your training needs before deciding.
Assessing Space And Use
Evaluate the area where the bag will be placed. Measure width, height, and depth. Ensure there’s enough room to move around the bag. Think about your training goals. Do you need a heavy bag or a lighter one? Heavy bags require more space and support. Light bags are easier to manage but may not offer the same resistance.
Selecting Dimensions
Choose a bag length that fits your height and reach. Taller individuals may need longer bags. Shorter bags suit younger users or those with limited space. Weight is another factor. A bag’s weight should match your strength level. Beginners might prefer lighter bags, whereas experienced boxers often opt for heavier ones. Balance your choice with the material of the bag. Synthetic materials are lighter, while leather is heavier.
Constructing The Bag
Constructing a punching bag at home is a rewarding DIY project. It allows you to customize your bag to your specific needs. Let’s dive into the steps of constructing the bag.
Filling Options
Choosing the right filling is crucial for a good punching bag. Different materials offer different resistance levels. Here are some popular options:
- Sand:Offers a heavy and firm feel. Ideal for strength training.
- Sawdust:Lighter than sand. Provides a softer punching surface.
- Old Clothes:Recycle old clothes for a medium resistance. Great for beginners.
- Rice:Offers a consistent and even feel. Suitable for all levels.
Securing The Fill
Once you choose the filling, secure it well inside the bag. This ensures the bag retains its shape during use. Use a strong inner lining to contain the fill. A tightly woven fabric is ideal. Seal the top with heavy-duty stitching or a zip. This prevents any spillage during intense workouts.
Covering The Bag
The outer cover of the bag must be durable. Canvas is a popular choice. It’s tough and withstands heavy punches. Leather is another excellent option. It offers a professional feel and is long-lasting. Secure the cover with strong stitching. Reinforce it at stress points for added durability. This ensures your punching bag lasts for many workouts.
Creating The Hanging System
Creating a sturdy hanging system is crucial for your punching bag. Securely attach a strong chain to the ceiling. Ensure it can support the bag’s weight safely.
Creating a punching bag is an exciting DIY project, but the key to its effectiveness lies in how it’s hung. The hanging system is crucial for ensuring stability and durability during your workouts. Whether you’re a seasoned fighter or just starting, a well-installed system will make your practice safe and enjoyable.Choosing A Suitable Location
Finding the right spot for your punching bag is essential. You need a space that allows you to move freely around the bag without knocking into furniture or walls. Consider areas like garages, basements, or any room with adequate ceiling height.
Assess the ceiling’s strength and ensure it can support the weight of the bag. A weak ceiling might lead to accidents or damage. It’s always a good idea to consult a professional if you’re unsure about your ceiling’s load capacity.
Think about noise considerations, too. Punching bags can be loud, and if your chosen location is near a bedroom or living area, it might disrupt others.
Attaching The Bag
Once you’ve chosen the perfect spot, it’s time to attach the bag. A sturdy beam or joist is ideal for hanging your punching bag. Use a heavy-duty hook or eyebolt, which can be securely fastened into the beam.
Don’t forget to check the weight capacity of the hook or bolt; it should be able to support more than just the weight of the bag. Consider the force you’ll exert on it during your workouts.
Use a reliable chain or rope to hang the bag, making sure it’s at the right height for your reach. Adjust the length as necessary, ensuring the bag swings freely but doesn’t wobble excessively.
Regularly inspect the hanging system for wear and tear. A compromised system can lead to unexpected falls or damage, so prioritize safety by checking it frequently.
Are you ready to start swinging at your homemade punching bag? What challenges do you anticipate in setting up your hanging system?
Safety Tips
Ensure a safe workspace by clearing the area of obstacles. Use sturdy materials like durable fabric and strong rope. Wear protective gloves to avoid injuries while assembling your homemade punching bag.
Safety is crucial when making a punching bag. You want to protect yourself and your surroundings. Follow these safety tips to ensure a safe workout environment.Ensuring Secure Mounting
Always mount your punching bag securely. Use strong hooks and brackets. Ceiling beams or wall studs are the best places. Check the weight capacity of your mounting hardware. Ensure it can hold the weight of your punching bag. Test the stability before each use. A loose bag can cause accidents.Proper Use Techniques
Use proper techniques when punching. Wear gloves to protect your hands. Start with light punches to warm up. Keep your wrists straight to avoid injury. Maintain a safe distance from the bag. Avoid overextension of your arms. Practice controlled movements for better results.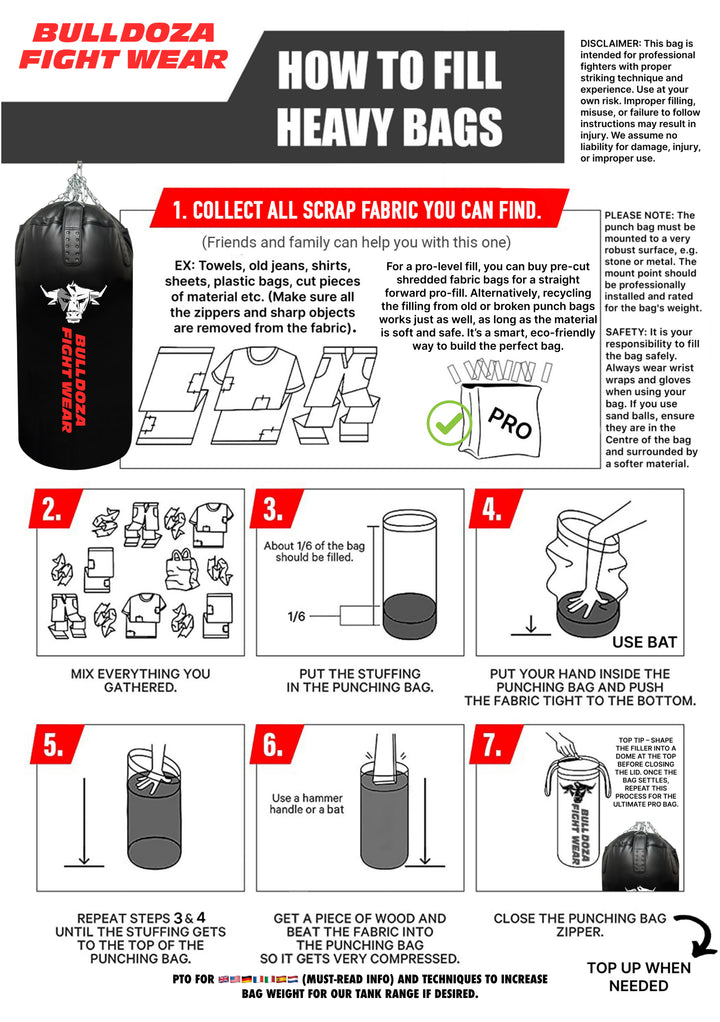
Credit: bulldozafightwear.co.uk
Maintenance And Care
Maintenance and care of your homemade punching bag are crucial to ensure its longevity and effectiveness. Neglecting this can lead to a quick deterioration and might even make your workouts less enjoyable. With a little effort, you can keep your punching bag in top condition, providing you with countless hours of training.
Regular Checks
Check your punching bag regularly for signs of wear. Look for loose stitching, torn fabric, or any areas that seem to be thinning. Regular inspections can help you catch potential issues early before they become major problems.
Keep an eye on the bag’s filling. Over time, the filling might settle unevenly, affecting the bag’s weight distribution and feel. Adjusting it periodically can help maintain a consistent punching experience.
Repairing Wear And Tear
Repairing small issues can save you from bigger headaches down the road. If you notice a tear, don’t wait for it to get worse. Use a strong thread and needle to stitch it up, or apply a durable adhesive patch.
For loose stitching, reinforce the seam with additional stitching. This adds strength to the bag’s structure and helps it withstand more punches.
Consider using a protective cover if your bag is exposed to the elements. This can help prevent damage from moisture or sunlight, extending the life of your punching bag. Have you ever thought about how a simple cover could make such a difference?
By incorporating these maintenance tips into your routine, you ensure that your punching bag stays in excellent shape for years. Regular care not only preserves the bag but also enhances your training experience. Isn’t it worth the small effort for the benefits it brings?
Frequently Asked Questions
How Do You Make A Punching Bag At Home?
To make a punching bag at home, fill a sturdy bag with sand or clothes. Secure it tightly with rope or duct tape. Hang it from a ceiling beam or sturdy hook. Ensure the bag is well-balanced and stable. Always use quality materials for safety.
What Can I Use If I Don’t Have A Punching Bag?
Use a heavy pillow, couch cushion, or stack of old clothes as a substitute for a punching bag.
What Filling Goes In A Punching Bag?
A punching bag can be filled with sand, shredded fabric, or rubber mulch for weight and density. Use old clothes, foam, or water for a softer impact. Combine different materials to achieve the desired firmness. Ensure the filling is evenly distributed to maintain the bag’s shape and performance.
What Is The Best Material For Punching Bags?
Leather is the best material for punching bags due to its durability and quality. It withstands regular use and provides a realistic feel. Synthetic leather is also a good choice for those seeking a budget-friendly option while maintaining durability. Both materials are suitable for different training levels and preferences.
Conclusion
Creating a punching bag at home is fun and easy. With basic materials, you save money and personalize your workout gear. Whether you’re a beginner or a pro, a homemade bag is useful. It helps improve strength, endurance, and technique.
Follow these steps, and soon you’ll punch your way to better fitness. Enjoy your DIY project and the benefits it brings. Share your experience with friends and inspire them. Building your own punching bag is a rewarding challenge. Get started and unleash your creativity.
Now, you’re ready to punch with confidence and skill!