
Are you ready to enhance your fishing skills and make sure your catch doesn’t slip away? Learning how to tie a fish hook properly is one of those must-have skills that can make all the difference between a successful day on the water and a disappointing one.
Whether you’re a seasoned angler or just getting started, mastering this simple yet crucial technique will boost your confidence and ensure you’re always prepared for your next fishing adventure. Imagine the satisfaction of knowing your hook is securely fastened, increasing your chances of reeling in that prized fish.
Dive into this guide and discover how easy it can be to perfect your hook-tying skills. Your next fishing trip is about to become more rewarding and enjoyable!
Choosing The Right Fish Hook
Choosing the right fish hook is crucial for successful fishing. The hook is your main connection to the fish. It affects how well you catch and hold them. Selecting the perfect hook can be challenging. You need to know about different types and sizes. This knowledge helps in making the right choice. Let’s dive into the types of fish hooks and selecting the appropriate size.
Types Of Fish Hooks
There are many types of fish hooks. Each type serves a specific purpose. Here are a few common ones:
- J-Hooks:These are the most traditional hooks. They resemble the letter ‘J’. Suitable for various fishing methods.
- Circle Hooks:These hooks curve in a circle. They are designed to hook the fish in the mouth, reducing gut hooking.
- Treble Hooks:These have three points. Often used in lures for increased chances of hooking.
- Octopus Hooks:Short-shanked hooks with a round bend. Ideal for baiting techniques.
Selecting The Appropriate Size
Hook size is another critical factor. It must match the type of fish you target. Here’s how to choose:
- Small Fish:Use smaller hooks like size 8 or 10. Suitable for catching small species.
- Medium Fish:Opt for hooks between sizes 4 and 6. Good for average-sized fish.
- Large Fish:Larger hooks, sizes 1 to 3/0, are ideal. Perfect for big game fishing.
Remember, the right hook size improves your chances. It ensures a secure catch and reduces fish injuries.
Essential Materials Needed
Tying a fish hook might seem tricky, but with the right materials, it’s manageable. Knowing what you need makes the process easier and more enjoyable. Let’s dive into the essential materials required.
Fishing Line Selection
Choosing the right fishing line is vital. Different lines suit different fishing environments. Consider these options:
- Monofilament Line:Great for beginners. It’s easy to handle and knot.
- Braided Line:Offers strength and sensitivity. Perfect for experienced anglers.
- Fluorocarbon Line:Invisible underwater. Ideal for clear water fishing.
Each line type has unique benefits. Match your line choice to your fishing conditions.
Necessary Tools
Having the right tools makes hook tying smooth. Here are some essentials:
- Hook:Choose a hook based on the fish type.
- Scissors:Use sharp scissors for clean cuts.
- Needle Nose Pliers:Useful for adjusting hooks and lines.
- Hook Tying Tool:A handy device for precise tying.
These tools simplify the process. They help ensure your hook is secure and ready for action.
Preparing The Fishing Line
Tying a fish hook requires careful attention. Begin by threading the line through the hook’s eye. Create a loop, wrap the line around itself, and pass the end through the loop. Pull tight to secure the knot.
Preparing the fishing line is a crucial step in ensuring a successful fishing experience. Whether you’re a seasoned angler or a beginner, taking the time to properly prepare your line can make all the difference. This process is about more than just practicality; it’s about maximizing your chances of landing the big catch. Have you ever found yourself wondering why your line keeps snapping or tangling? Ensuring your fishing line is in top condition could be the answer.Cutting The Right Length
Selecting the appropriate length of line is essential for your fishing adventure. Too short, and you might miss out on distant catches; too long, and it can become a tangled mess. Generally, a good rule of thumb is to cut a length that suits your fishing environment and target species. Consider what you’re aiming to catch and where you’re fishing. Are you casting from a boat or the shore? Measure twice, cut once. Make sure you have a sharp pair of scissors or a dedicated line cutter for precision. This ensures a clean cut, preventing fraying that could weaken your setup.Inspecting For Damage
Before you tie your hook, give your line a thorough inspection. Check for nicks or abrasions that could compromise its strength. A damaged line might snap under the pressure of a strong fish, ruining your chance of a successful catch. Run your fingers along the line to feel for any irregularities. Look closely for any visible signs of wear. Have you ever lost a fish due to a frayed line? A quick inspection can prevent that heartache. If you find any damage, cut off the affected section to maintain the integrity of your line. Taking these preparatory steps ensures your fishing line is ready for action, increasing your chances of a rewarding fishing experience.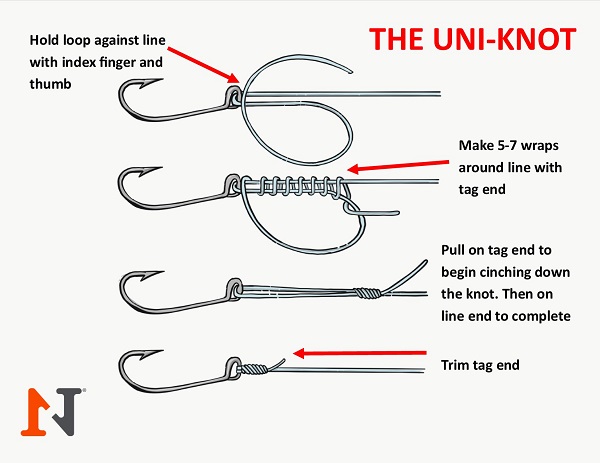
Credit: n1outdoors.com
Popular Knot Techniques
When you’re out fishing, knowing how to tie a fish hook properly can make the difference between a successful catch and a missed opportunity. Different knot techniques offer varying strengths and ease of use. Let’s dive into some of the most popular knots that can enhance your fishing experience.
Improved Clinch Knot
The Improved Clinch Knot is a favorite among anglers due to its reliability and simplicity. It’s particularly effective for securing your line to the hook. To tie this knot, thread the line through the hook’s eye and wrap it around the standing line five to seven times. Then, pass the end of the line through the loop near the hook and back through the big loop you just created. Pull it tight.
Many fishermen swear by this knot for small to medium-sized fish. When I first learned it, I was amazed at how secure my lure stayed, even with energetic bites. Have you ever tried it in fast-moving waters?
Palomar Knot
The Palomar Knot is known for its strength, making it ideal for braided lines. Start by doubling your line and passing it through the hook’s eye. Tie a loose overhand knot, then pull the loop over the hook. Tighten by pulling on both ends of the line. This knot is simple and incredibly strong.
My fishing buddy once used a Palomar Knot on a slippery eel hook, and it held firm. It’s great when you need assurance that your line won’t slip. Can you recall a time when your knot failed and you wished you’d used this one?
Snell Knot
The Snell Knot is perfect for keeping the hook aligned with the line, offering better bait presentation. Start by passing the line through the hook’s eye, forming a loop. Wrap the line around the hook shank eight to ten times, then pull the end through the loop to tighten.
In a fishing tournament, using the Snell Knot helped me land a prize catch by ensuring my bait looked natural. It’s ideal for those who seek precision. Have you ever experimented with different knots to see which one works best for your style?
Each knot technique has its unique strengths, and trying them out can transform your fishing trips. Which knot will you master next?
Step-by-step Knot Tying
Ensure the fishing line is threaded through the hook’s eye. Create a loop by passing the line over itself. Wrap the line around the hook and loop several times, then pull to tighten. Trim the excess line for a clean finish.
Tying a fish hook may seem daunting, but it’s quite simple. A well-tied knot ensures your line stays secure. Follow this guide to learn knot tying step-by-step. It’s easy, even for beginners. Let’s dive into the details.Threading The Line
Begin with a clean cut on your fishing line. Insert the line through the hook’s eye. Pull around six inches through for easy handling. Ensure the line is smooth and free of twists.Making The Loop
Create a loop with the short end of the line. Hold both the loop and the hook. Wrap the short end around the main line. Make five turns for a strong knot. Keep the loops tight and even.Securing The Knot
Pass the short end through the loop near the hook. Gently pull both ends of the line. This tightens the knot. Wet the knot with water or saliva. This reduces friction. Trim any excess line close to the knot. Ensure it’s neat and tidy.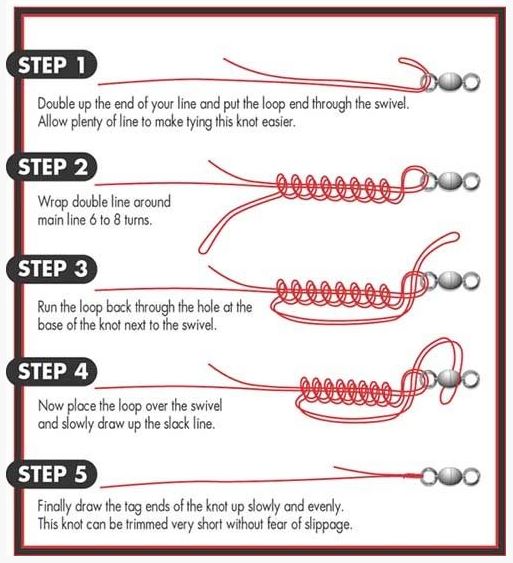
Credit: www.beadinggem.com
Testing The Knot Strength
Testing the knot strength ensures a secure fish hook. Pull gently on the line to check stability. A strong knot helps catch fish effectively and prevents losing them.
Testing the strength of your knot is crucial for successful fishing. A weak knot can result in lost fish and frustration. Ensuring your knot is secure gives you confidence in your fishing setup. Let’s explore how to test knot strength effectively.Applying Tension
Begin by gently pulling the line. Ensure the knot tightens evenly. Watch for any unusual movement. This indicates a potential weak spot. Gradually increase the force applied. Simulate the tension of a fish on the line. The knot should hold firm without slipping.Checking For Slippage
Examine the knot closely. Look for any signs of slippage. A good knot stays in place without loosening. Use your fingers to feel the knot. Notice if it feels secure and tight. If it slips, retie the knot and test again. This ensures your fishing setup is reliable.Troubleshooting Common Issues
Learning to tie a fish hook can sometimes be tricky. Common issues arise, causing frustration. But don’t worry. With a little practice, these problems can be resolved. Below, we’ll explore solutions to common knot-tying issues. Let’s dive in!
Fixing Loose Knots
Loose knots are a common issue in fishing. They can cause the hook to slip. To fix this:
- Ensure the knot is tight before trimming excess line.
- Moisten the knot before pulling it tight to reduce friction.
- Double-check the knot’s security by giving a gentle tug.
A well-tied knot stays firm. Keep practicing for better results.
Avoiding Line Breakage
Line breakage can lead to lost fish. It often happens due to improper knot tying:
- Use the correct knot for your line type.
- Inspect the line for any damage before tying the knot.
- Avoid using too much force when tightening the knot.
Regular practice helps in reducing line breakage. Check your equipment often.

Credit: www.ohero.com
Safety Tips While Tying
Ensure your hands are dry and clean before tying a fish hook. Use a strong knot to keep the hook secure. Avoid rushing, as careful steps prevent accidents.
Tying a fish hook might seem like a straightforward task, but ensuring your safety while doing so is crucial. Mishandling sharp hooks or forgetting to protect your hands can lead to injuries that could easily be avoided. Let’s explore some essential safety tips to keep you protected as you master this skill.Handling Sharp Hooks
– Always be aware of where the hook point is directed. Avoid pointing it towards yourself or others. – Store hooks in a secure container when not in use to prevent accidental pricks. – While tying, keep the hook in a steady position to prevent it from slipping. Using a clamp or a vice can provide extra stability. – If you drop a hook, don’t panic. Slowly and carefully look for it to avoid stepping on it.Protecting Your Hands
– Wearing gloves is a great way to shield your hands from unexpected jabs. Choose gloves that offer both protection and dexterity. – Keep your hands dry. Wet hands can lead to the hook slipping, which increases the chance of injury. – Consider using a finger guard or thimble on the fingers most in contact with the hook. This simple tool can prevent painful nicks. – Regularly inspect your hands for any cuts or scratches. Immediate cleaning and bandaging of minor injuries can prevent infection. Ensuring your safety while tying a fish hook enhances your fishing experience and keeps you focused on the catch. What additional safety measures do you take when handling sharp objects? Your insights could help others enhance their safety practices.Additional Tips For Success
Mastering the art of tying a fish hook enhances your fishing experience. With practice and the right tools, you can secure your hook effectively. Here are some additional tips to ensure your success.
Practicing Regularly
Practice makes perfect. Allocate time each week to practice tying knots. This helps improve your skills and boosts confidence. You become more efficient each time you tie a hook. Practicing regularly allows you to experiment with different knot types. Try various knots to find which suits you best.
Use a spare fishing line for practice sessions. This saves your primary line and helps you learn without pressure. Practicing in a relaxed environment enhances learning. Repeat the process until you feel comfortable and confident.
Using Knot Guides
Knot guides are valuable tools. They provide step-by-step instructions and visual aids. Many guides are available online or in fishing stores. Some guides offer diagrams or videos for better understanding. This ensures you tie knots correctly and securely.
Choose guides that are easy to follow. Simple guides help non-native speakers grasp the technique easily. Bookmark useful guides for quick reference during practice or fishing trips. Knot guides are handy resources for improving your knot-tying skills.
Frequently Asked Questions
How To Tie A Fishing Hook For Beginners?
Start by threading the line through the hook eye. Make five wraps around the line. Pass the end through the loop near the hook eye. Tighten by pulling both ends. Trim excess line for a secure knot. Practice the improved clinch knot for best results.
How To Tie A Fishing Rig For Beginners?
Start by threading the line through a hook. Add a sinker below the hook. Attach a swivel for easy casting. Ensure knots are tight and secure. Practice the basic knots like Palomar or Clinch Knot for reliability. Use the rig to catch fish effectively.
How To Tie A Fisherman’s Knot Step By Step?
Start by threading the rope through the hook’s eye. Wrap the rope around itself five times. Pass the end through the first loop. Tuck it back under itself. Pull tight to secure the knot. Trim any excess rope for a neat finish.
Practice ensures a strong fisherman’s knot.
What Is The Strongest Way To Tie A Hook?
The Palomar knot is the strongest way to tie a hook. It is simple, reliable, and retains high knot strength. Ensure the line is doubled, pass it through the hook eye, tie an overhand knot, then loop the hook through and tighten securely.
Ideal for braided and monofilament lines.
Conclusion
Mastering the art of tying a fish hook can enhance your fishing experience. Practice makes perfect, so try these techniques often. Use the right knot for your specific fishing needs. Pay attention to details for success. Knots hold your catch, so ensure they’re secure.
Enjoy the calm and excitement fishing brings. A well-tied hook boosts your chances of landing a big catch. Share these tips with friends and family. They might find them helpful too. Happy fishing, and may your next trip be fruitful.