
Have you ever noticed your golf game isn’t quite up to par, despite your best efforts? Sometimes, the issue isn’t your swing but your equipment.
A worn-out or damaged golf club shaft can drastically affect your performance. This isn’t just a problem for professional golfers; it can impact anyone who enjoys the sport. Imagine the satisfaction of knowing you can fix this problem yourself, saving money and improving your game at the same time.
Replacing a golf club shaft might seem daunting, but with the right guidance, you can do it with ease. You’ll not only enhance your skills but also gain a deeper understanding of your equipment. Ready to take control of your game and boost your confidence on the course? Let’s dive into the simple steps you need to follow to replace a golf club shaft efficiently.
Tools And Materials Needed
Replacing a golf club shaft requires a few essential tools and materials. Gather a golf club shaft extractor, epoxy adhesive, sandpaper, and a heat gun to safely remove and install the shaft. Ensure you have protective gear, like gloves and safety glasses, for a smooth and secure process.
Replacing a golf club shaft can feel like a daunting task, but with the right tools and materials, it becomes a straightforward process. Having the correct equipment not only makes the job easier but also ensures a professional finish. Let’s dive into what you’ll need to get started.Grip Tape
The first essential item is grip tape. It ensures that the new grip sticks firmly to the shaft. You’ll need enough tape to cover the length of the grip area. It’s typically sold in rolls, so you can cut it to the size you need.Epoxy Adhesive
Epoxy is crucial for securing the shaft to the clubhead. Look for a quick-drying two-part epoxy designed specifically for golf clubs. It’s strong and provides a reliable bond.Shaft Cutter
If you need to trim the new shaft to the correct length, a shaft cutter is indispensable. This tool allows for clean, precise cuts without damaging the material. A hacksaw can also work in a pinch, but ensure you have a fine-toothed blade.Heat Gun
Removing the old shaft often requires loosening the epoxy bond. A heat gun is perfect for this job, as it provides controlled heat without open flames. If you’re not careful, too much heat can damage the clubhead, so use it wisely.Rubber Vice Clamp
A rubber vice clamp holds the club securely while you work, preventing any unwanted movement. This tool is essential for maintaining stability and ensuring safety during the process.Solvent
You’ll need a solvent to activate the grip tape. It also helps slide the grip onto the shaft smoothly. Many solvents are available, but make sure it’s safe for your specific grip type.Protective Gloves And Safety Goggles
Safety should never be an afterthought. Protective gloves and safety goggles protect you from harmful chemicals and accidental cuts. It’s better to be safe than sorry. With these tools and materials ready, you’re all set to replace your golf club shaft. Are you prepared to transform your game with a DIY touch?Preparing The Golf Club
Replacing a golf club shaft can breathe new life into your game. Whether upgrading for performance or fixing a break, preparation is key. By taking the time to properly prepare your golf club, you ensure a smooth and effective shaft replacement process.
Removing The Club Head
Begin by carefully removing the club head from the shaft. A heat gun is an excellent tool for this task, as it softens the epoxy holding the head in place. Use even, circular motions to apply heat without burning the club.
Once the epoxy is sufficiently softened, use a shaft puller to gently detach the club head. Avoid using excessive force, as this could damage the head or shaft. Patience is crucial here, as rushing could lead to irreversible damage.
Cleaning The Shaft Area
With the club head removed, it’s time to clean the shaft area. Use a wire brush to remove any remnants of epoxy. This step is crucial for ensuring a secure fit for the new shaft.
After brushing, wipe down the area with a damp cloth to eliminate dust and debris. Ensuring a clean surface is essential for the adhesive to bond properly. Have you ever considered how small details like this impact the overall performance of your club?
By meticulously cleaning and preparing the shaft area, you set the stage for a successful shaft replacement. This attention to detail can make all the difference in your game.
Choosing The Right Shaft
Selecting the ideal golf club shaft requires careful consideration. Assess material, flex, and length for optimal performance. Tailor your choice to match swing speed and style, ensuring a seamless replacement process.
Choosing the right shaft for your golf club is crucial. It affects how you swing and the ball’s flight. A well-selected shaft can improve your game significantly.Understanding Shaft Flex
Shaft flex refers to how much the shaft bends during a swing. Different flex levels suit different swing speeds. Faster swingers need stiffer shafts. Slower swingers benefit from more flexible shafts. Knowing your swing speed helps choose the right flex.Selecting Shaft Material
Shafts come in various materials. Steel shafts offer durability and consistency. Graphite shafts are lighter and provide more speed. Some players prefer the feel of steel over graphite. Others seek the increased distance from graphite. Each material has unique benefits. Choosing the right shaft involves understanding these factors. Consider your swing speed and preferred feel. Select a material that matches your needs. This decision can enhance your performance on the course.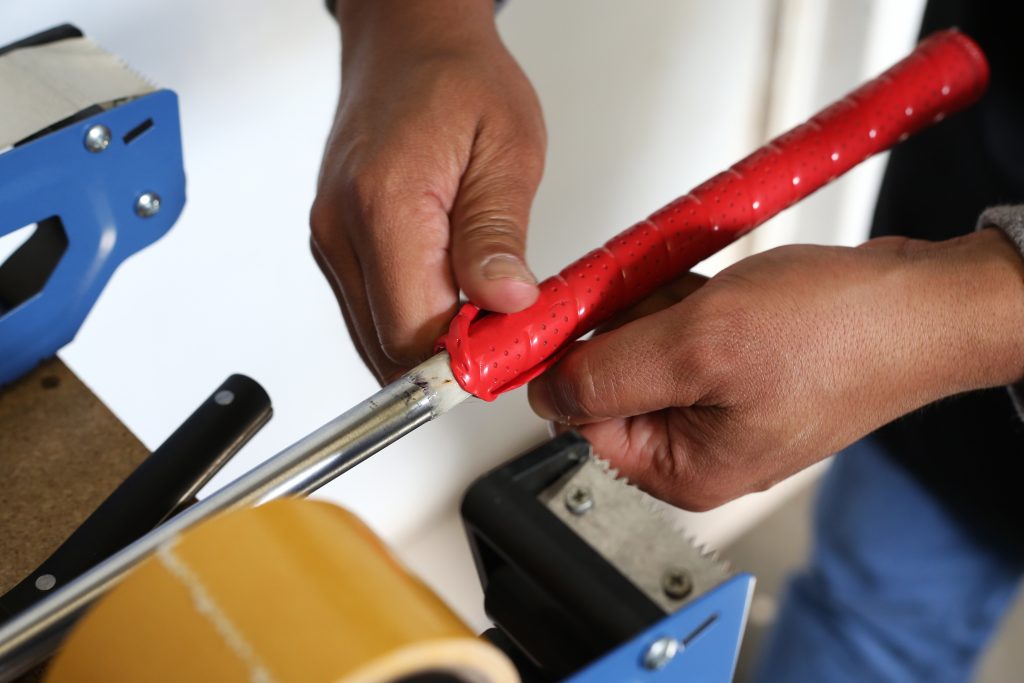
Credit: bramptontechnology.com
Removing The Old Shaft
Removing the old shaft from your golf club is a crucial step that requires precision and care. Whether you’re upgrading your clubs or repairing them, the process starts with getting rid of the existing shaft. It’s not as daunting as it sounds, but it does need careful handling to ensure you don’t damage the clubhead or the grip. Let’s dive into the steps to safely remove the old shaft and prepare for the new one.
Using Heat To Loosen Adhesive
The bond between the shaft and the clubhead is often reinforced with epoxy adhesive, which can be stubborn to break. Heat is your friend here. Applying heat to the hosel (the part where the shaft meets the clubhead) helps to soften the adhesive, making it easier to detach the shaft.
- Use a heat gun or a propane torch for this task. Avoid direct flame contact with the clubhead to prevent damage.
- Keep the heat source moving around the hosel to ensure even heating. This prevents overheating one area and causing potential warping.
- When the adhesive is sufficiently softened, you will notice the shaft starting to loosen. This is your cue to proceed with the removal.
Have you ever wondered why some golfers never quite get the right fit with their clubs? It often comes down to the shaft. Removing and replacing it might be the answer to finding that perfect swing.
Safely Removing The Shaft
Once the adhesive has been softened, it’s time to carefully remove the shaft. This step demands patience and a steady hand to ensure the clubhead remains intact.
- Use a shaft puller to gently extract the shaft from the hosel. A shaft puller provides controlled pressure, minimizing the risk of damage.
- If you don’t have a shaft puller, a vise can work as an alternative. Secure the clubhead in the vise and gently twist and pull the shaft.
- Be mindful of the grip and clubhead alignment during removal. Slight mishandling can lead to misalignment, affecting your gameplay.
Taking the time to properly remove the shaft sets the foundation for a successful replacement. Ask yourself: how often do you check your clubs for wear and tear? Regular maintenance can be the key to consistent performance on the course.
Installing The New Shaft
Installing the new shaft requires precision and patience. Carefully remove the old shaft and clean the clubhead. Align the new shaft properly and secure it with epoxy to ensure stability.
Once you’ve removed the old shaft, it’s time to install the new one. This phase is crucial because a secure fit ensures optimal performance on the course. Handling it with care and precision will help you avoid unexpected troubles during your game. Let’s dive into the specifics of installing your new golf club shaft.Applying Epoxy
Start by selecting a high-quality epoxy specifically designed for golf clubs. This is essential for a strong bond and long-lasting performance. Mixing the epoxy thoroughly is key; uneven mixtures can weaken the hold, leading to potential damage mid-swing. Apply the epoxy inside the club head’s hosel and on the tip of the new shaft. Be generous but avoid over-applying. Excess epoxy can ooze out, creating a mess and possibly affecting the club’s balance.Securing The Shaft
Insert the new shaft into the club head’s hosel immediately after applying the epoxy. Ensure it fits snugly and correctly aligned. You don’t want a crooked club, do you? To secure the shaft, apply steady pressure while rotating it slightly. This ensures an even distribution of the epoxy and eliminates air bubbles. Once in place, wipe away any excess epoxy with a clean cloth. Let the club rest vertically in a safe spot where it won’t be disturbed. Depending on the epoxy, curing can take several hours to a full day. Patience here pays off on the green. Are you ready to see the improvements in your swing?
Credit: www.amazon.ca
Reattaching The Club Head
Reattaching the club head involves aligning it correctly after replacing the shaft. Ensure a snug fit for stability. Use epoxy to secure the club head firmly to the new shaft.
Reattaching the club head is a crucial part of replacing a golf club shaft. This step ensures your club performs well on the course. Taking care to align and fit the club head properly prevents any mishaps during your game. Let’s delve into the essential steps of reattaching the club head.Aligning The Club Head
Align the club head with the shaft carefully. Make sure the club face is square to the target line. Use a visual reference, like a floor tile or a piece of tape. This helps maintain accuracy during play. Use a steady hand to hold the head in place. A slight misalignment can affect your swing. Take your time and ensure the head is perfectly aligned.Ensuring Proper Fit
Check that the club head fits snugly onto the shaft. Inspect the hosel, the part of the club where the shaft fits. It should be clean and free of debris. Apply a small amount of epoxy to the inside of the hosel. This secures the head to the shaft firmly. Insert the shaft into the hosel, twisting gently to spread the epoxy evenly. Wipe away any excess epoxy with a damp cloth. Allow the club to dry and set for at least 24 hours. This ensures a strong and lasting bond. These steps help in achieving a solid connection between the club head and the shaft. They ensure that your golf club is ready for a great game.Final Adjustments And Testing
Final adjustments and testing ensure the new golf club shaft is perfectly aligned and secure. Check the grip and shaft connection for any loose ends. Swing the club to test its balance and feel, ensuring optimal performance on the course.
Replacing a golf club shaft is only half the battle; the real magic happens in the final adjustments and testing phase. This stage ensures that your revamped club performs just right on the golf course. Imagine stepping onto the green with confidence, knowing your club is perfectly tuned to your swing. Let’s dive into the crucial steps that make this possible.Checking Balance And Weight
Balancing your club is essential. A well-balanced club improves your control and precision. Hold the club horizontally and check if it feels evenly weighted. If it tips to one side, adjustments are needed. Consider adding lead tape to the lighter side to achieve balance. A balanced club supports a smoother swing, giving you the edge you need.Testing Swing Performance
The real test lies in your swing. Take your club to the driving range and hit a few balls. Pay attention to how the club feels in your hands—does it feel natural or awkward? Watch the ball’s flight; is it consistent with your usual performance? Your swing should feel effortless, allowing you to focus on technique rather than equipment. Adjust if needed, and remember: the perfect fit is a game-changer. What adjustments will you make to perfect your swing? Each tweak brings you closer to golf glory.Credit: www.everythingbrunei.com
Maintenance Tips
Maintaining your golf club shafts ensures durability and performance. Regular care keeps your clubs in top shape, reducing the need for frequent replacements. Follow these simple tips to extend your shaft’s lifespan.
Regular Inspection
Check your golf club shafts for signs of wear or damage. Look for cracks, dents, or bends. An early catch can prevent more significant issues. Wipe shafts clean after each game to remove dirt and moisture. This keeps them looking new and prevents corrosion.
Proper Storage
Store your golf clubs in a cool, dry place. Excessive heat can weaken the shafts over time. Use a golf bag with individual club dividers. This prevents shafts from clashing and getting scratched. Avoid leaning clubs against walls for long periods. This might cause unwanted bends.
Frequently Asked Questions
Can I Replace A Golf Shaft Myself?
Yes, you can replace a golf shaft yourself with the right tools and some patience. Ensure you follow proper instructions and safety measures. A professional can ensure optimal performance and avoid damage. Consider consulting a club repair expert if unsure.
Is It Worth Getting Clubs Reshafted?
Reshafting clubs can enhance performance and tailor them to your swing. It’s cost-effective compared to buying new clubs. Ensure shafts match your playing style and preferences for optimal results. Consult with a professional to determine if reshafting suits your needs.
How Much Does It Cost To Replace A Shaft On A Golf Club?
Replacing a golf club shaft typically costs between $30 to $100. Prices vary based on brand and material. Labor fees can add another $20 to $40. Customization or premium options may increase costs. Always check with your local pro shop for exact pricing tailored to your needs.
How Much Does It Cost To Reshaft A Set Of Irons?
Reshafting a set of irons typically costs between $20 to $30 per club. Prices vary based on shaft type and labor. Customization and premium materials can increase costs. Always consult a professional for accurate quotes and quality service. Reputable golf shops offer competitive pricing for reshafting services.
Conclusion
Replacing a golf club shaft sounds tricky, but it is doable. Carefully follow the steps outlined above. Take your time and focus on each stage. Ensure you have the right tools ready. Safety should be your priority throughout the process.
If uncertain, seek help from a professional. Your golf experience depends on well-maintained equipment. Practice patience and precision for best results. Enjoy the satisfaction of completing the task yourself. Check your club’s performance after the repair. Keep learning and improving your skills.
Better golf days are ahead.